This bracelet has been inspired by this really wonderful “Braided Hex-nut Bracelet” tutorial which I pinned on Pinterest a while back.
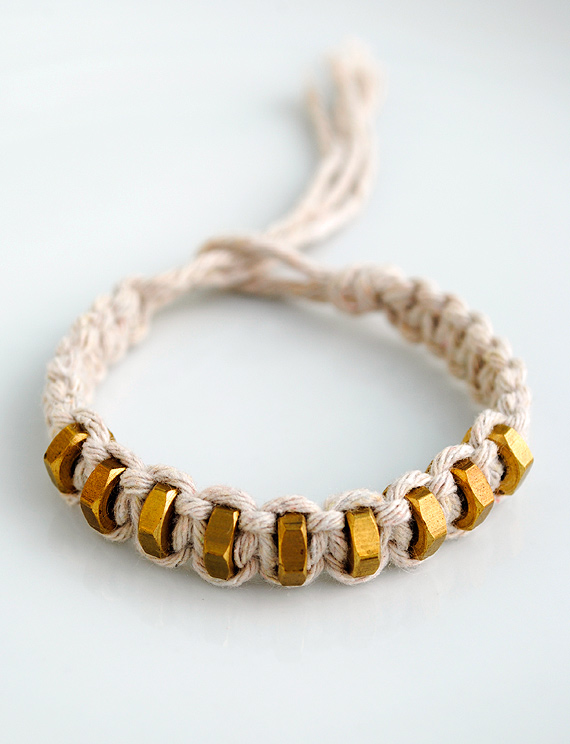
Two things I absolutely love about this project are:
1) It’s cheap as chips: I already had string in the cupboard and the brass hexnuts were 3p each from the hardware shop.
2) It’s my kind of jewellery: I’m not really a girly girl IYKWIM!
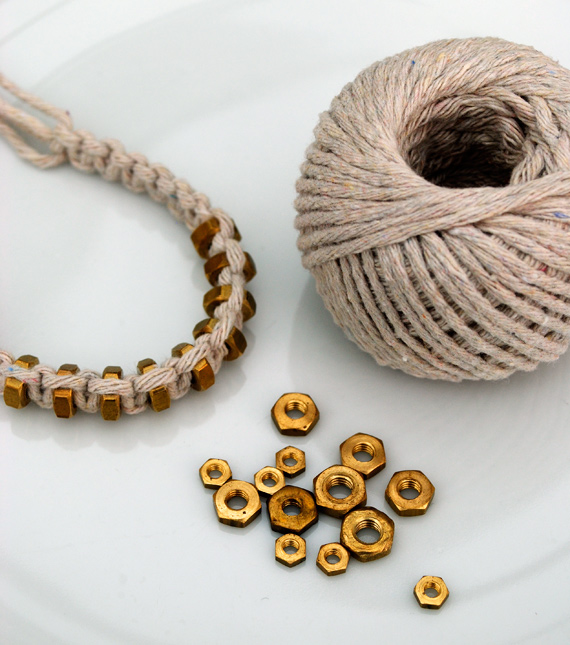
The bracelet I made is a bit different to the ‘braided hex-nut bracelet’ and uses macrame instead, which is great, because I promised some tutorials a while back and felt a bit bad that I hadn’t written any yet!
Full instructions after the jump! Happy knotting!
Square Knot
Please note: I have used different colored cord in the tutorial so that it’s easier for you to figure out whats going on!
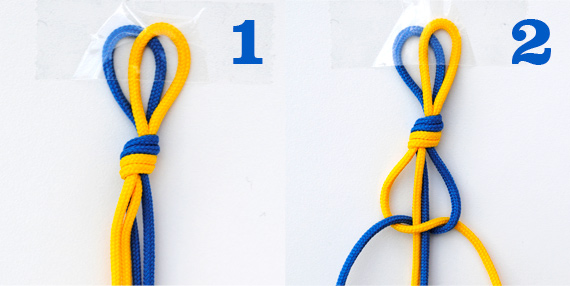
1. Knot four cords together
2. Bring the left cord over the two middle cords. Then bring the right cord over the left cord, under the two middle cords and through the loop formed by the left cord. Pull the right and left cord until the knot tightens.
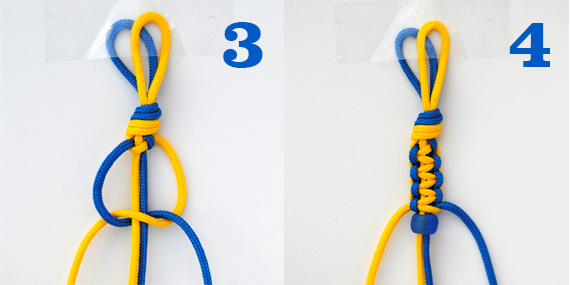
3. Bring the right cord over the two middle cords. Then bring the left cord over the right cord, under the two middle cords and through the loop formed by the right cord. Pull the right and left cord until the knot tightens. Yippee…you have tied a square knot.
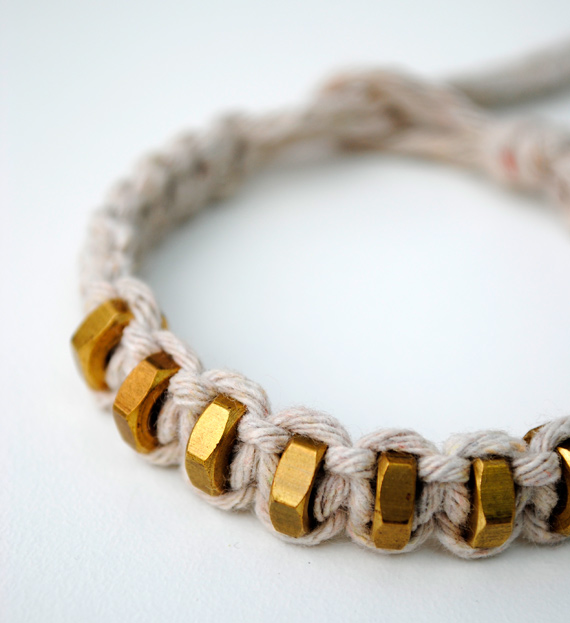
4. If you want to introduce a bead (or hexnut) then simply thread it through onto the two middle cords then carry on tying square knots.
This might seem a little tricky a first but I promise once you have done it a dozen times you’ll be sorted….!
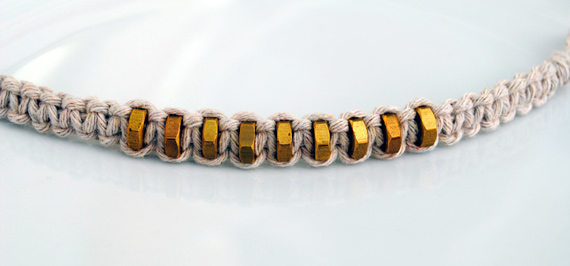
For the hex-nut bracelet I used four lengths of string, measuring about 60cm each in length and tied the following knots:
8 Square knots
1 hex-nut
1 square knot
1 hex-nut
1 square knot
1 hex-nut
1 square knot
1 hex-nut
1 square knot
1 hex-nut
1 square knot
1 hex-nut
1 square knot
1 hex-nut
1 square knot
1 hex-nut
1 square knot
1 hex-nut
8 square knots
(There’s probably a short-hand way of writing this but shorthand instructions always scare me so I generally give them a wide berth!)
If you need a hand then leave a comment and I’ll get back to you.

Hi Amy K. One end has a loop and the other end has some ‘tails’ IYKWIM. It just ties together like a friendship bracelet.
this looks so much easier then I would ever had imagine. Thanks for the tutorial 🙂
I love it ! Must try it soon ! Thanks for the tutorial !
love it, and boys would love it too!
Hi Lisa….agree about the boy thing! x
love the way it looks. What kind of thread did you use?
So much fun! I’ve just made one whilst watching TV using string and some plastic pony beads I found loitering in my craft box. Planning to take a pic tomorrow for my blog :o) Thanks for the tutorial x
So cool! Love the effect, I’m hoping to make my first friendship bracelet soon… That may come as a shock if you realise how old I am ha ha…
Hi Jayja…it’s just parcel string from the DIY section in the supermarket…nothing fancy at all!
Makey-cakey….looking fwd to seeing your pictures. Yep…prefect for making in front of the telly…they are pretty easy to whip-up once you have the hang of it.
Hi little wren….I do love friendship bracelets too and have been meaning to make some lately! (I remember making them at school yonks ago after ransacking my mums stash of embroidery silks!).
Hey Kate! This is awesome. It will go perfectly with another DIY bracelet I spotted just today. Total arm party material! We’re heading into warmer weather here in Australia…I think your bracelet is my new summer accessory. (Other bracelet is here if you are interested honestlywtf.com/diy/diy-wrap-bracelet/) Hope you’re well. Lisa x
It’s a good idea, the result is really lovely !
Hi Ariana, nice of you to pop over again! Yes, give me a hardware store over a jewelry store any day of the week! I could spend hours poking through our local one.
Hope you are well. Looking fwd to winter so I can see more of your crafts!!! 🙂
As a casual crafter, I really appreciate the lack of shorthand 🙂 Thanks for the awesome project!
No problem Jacqueline! I am a jack-of-all-trades, master-of-none, so shorthand never has suited me!!
It’s gorgeous! I’ve been eyeing up a very expensive bracelet that looks much the same and wondering if I could make one… now I know how. Thank you!
(I think the lefts and rights might be around the wrong way in steps 2 and 3 though. The left cord is the first to go over the middle cords in the photos.)
Thanks Sarah. You are absolutely right!!! I have changed it. I am one of those people who just cannot figure out rights/lefts!!!
Hi there Lisa. The nuts I used were 8mm in diameter (from edge to edge…NOT the diameter of the hole) and the string about 2mm in diameter….hope that helps.
Hi Kate! I’m a dude, I love it. I made one using black shoelaces, four zinc hexanuts and two brass hexanuts at each end. It looks epic. So ya… guys like it. Thanks for the tut! I also made one of your half knot spiral but it didn’t turn out as good as this one… Do you think you can have post some more tuts of similar design, or at least something that can be… modified, for a more guy-ish look?
Thanks!
I absolutely LOVE this bracelet! For a good rocker look try black cording, its beautiful with the brass nuts. A handy tip if you have problems keeping it taped down while you knot: I safety pin it to the arm of a chair or couch, or even my jeans on my leg if I have nowhere else to pin it.
Hi! I love your idea! but…. I was wanting to make this bracelet from leather cord for the black and gold effect. I was wondering what diameter you would recommend?
Hi Emma…it kind of depends on your taste really. If you opt for a smaller diameter then just make sure you use smaller nuts and vice versa. You may need to make a test bracelet first just to check how many knots you need to make etc.
Hi Noah…nice to see a dude here!! Will try and get some more bracelet tutorials up after christmas…aimed at blokes!!
Hi Britny…it’s so hard to approximate because it really depends on the width of your string and the size of the nuts. The two central cords only need to be the same diameter as your wrist (+ a few extra inches). The outer cords certainly no more than 60cm?? they are pretty quick to knock up so you could always make a test one first…
Hey Kate, nice bracelet, I just knocked one together this evening. But a note of caution for your other readers! If you go into a hardware store and ask for 8mm hex-nuts then you will get hex-nuts with an 8mm hole that are actually 14mm wide on the outside. The bracelet ends up being a lot chunkier, and is best made with thicker cord or more strands of a thinner cord down the middle. Ends up being okay for a guy with big wrists! ^_^
Thanks Kyo…I should have specified. Sorry about that! Have edited the comment!
I tried the braided hex nut bracelet with no luck, but I’m hoping this will work better. Do you think it matters how thick the string you are using is? Could I do this with embroidery thread?
Hi Jbive…bad luck with the braided one…I have to confess I didn’t try it out
As far as this one is concerned I would be tempted to use string…slightly thicker than embroidery thread. You could give the embroidery thread a go and see how it works out but I think it would be too thin.
Do report back and let us know how it goes!
Thanks for getting back to me so quickly! I will definitely report back and let you know how it goes. Thanks again!
Hi Sam,
Yes, that’s right. So the two centre cords can be shorter!
Kate 🙂
Well, I’d say it worked, though it doesn’t look anything like yours, and the hex nuts don’t stay on the right side of my wrist because the embroidery thread is too light, and the thread doesn’t cover the hex nut at all, but it’s still pretty cool. Yours is a million times better though. I’ll try to get pictures to you. Thanks!
Hey you can always try smaller beads with the embroidery thread if the nuts are too heavy….
Thanks Clancy…the bead sounds like a great idea!
Well, I’m having trouble getting a picture to you, so oh well. My friend got me some thick twine so i tried again with much more luck. I love it! Thanks for the awesome tutorial! I hope to see more in the future. 🙂
Yeah…thrilled you managed to get there Jbive. You can always email me the pics if you want. My address is hello.minieco@gmail.com
Cheerio for now
Kate 🙂
I love this bracelet. Haven’t tried it yet, but will soon. I’m glad to see macrame come back. Thanks for the tutorial.
this tutorial is awesome, i just made mine and I’m super proud of it, thanks so much
i have really small wrists so i did:
4 square knots
hexnut
square knot
hexnut
square knot
hexnut
square knot
hexnut
square knot
hexnut
square knot
4 square knots
it worked out perfectly 😀
Wonderful blog, It looks like easy to make this bracelet, but I have to do it 3 times, thanks for the tips, that’s great.
Hi Tomas…I had to make it a few times too. There are lots of variables (width of string, size of nuts, size of wrists)…so it’s tricky to get it right first time. Glad it worked out in the end 🙂
Thanks for the info Kim!
What size hex nuts do you use? what is the smallest?
i really enjoy your ideas but how to copy the item has not been successful for all i got was all of the comments of other people that was very waste for my paper and ink …so i guess you will hopefully help me in how to receive the instructions for i don’t remember things very good but would love to do all of these ….thank you…i really like the ideas …
What Kind of string did you use tin the demonstration?
what kind of string did you use to show how to ties the knots ? And where did you buy the string (blue and yellow string)?
Hi Emely….it’s just standard string from the supermarket/hardware shop. (The kind you buy for gardening).
Hi Leslie. I used shoelaces for the demonstration….you could use beading cord instead.
Hi Madeline. Right click on the image and click on ‘open image in new tab’ that way you can just print off the image.
I can’t tell you how much I LOVE this bracelet! I made one with brass nuts and olive green leather cord, wire wrapped the ends with brass wire and added a handmade s-clasp…and my boyfriend stole it! Good thing they’re so easy and fun to make. 😉 Thank you so much for sharing this, it’s brilliant.
Thanks for such a kind comment Jacqueline ^_^
LOVE IT! My daughter and I just spent the day making bracelets. She’s 8 and looking at the pictures, she was able to follow and make a few herself. Thank you so much for posting the instructions!!
Glad it went well Heather!
Hi Chelsea…it really depends on the size of your string and the size of your wrist. I generally just cut more than I think I will need.
Awesome! Ty for using dif. colors & NO shorthand. I’m very craft-challenged & this works great for me.
Hi Brenna….I just tied it like a friendship bracelet ^_^
wow! this bracelet beautiful and extremely creative, the explanation is also laid out very well. very unique!
Hey Kate, I cant figure out what the first knot is supposed to be, or how to do it. Are there 4 separately cut cords? and how do I arrange them when i’m “knotting” all four together?
Hi Eric,
You need two long lengths of string and then you fold them in half. Then you tie a regular knot…just by where you have folded them and it forms the loop. Hope that helps. I you are still struggling then check out youtube…there seems to be a lot of tutorials on there now!
Yes that helped, thanks. Also how to you fix it on your wrist at the end? Do you just tie one end to the looped end?
Hi Eric, yes, that’s right. There are other more sophisticated fastenings for friendship bracelets but I didn’t get a chance to try anything else. ^_^
I gotta try this, yours is SO pretty!
Really nice! Beautiful work!
Hi Kate, I was wondering what type of rope or string you used for the blue and yellow bracelet
Thanks so much! This type of bracelet is popular at my school right now and I was curious on how to make them. I’ll have to try it soon! 🙂
Yay…let me know how you get on Lily. I remember selling friendship bracelets to my friends at school – long time ago now 😉 x
I absolutely love this knot, it looks so good, thanks for the tutorial. I found a bracelet that uses the same knot as has beads threaded on but I cannot work out how its done. I was wondering if you had any ideas? http://shop.stelladot.co.uk/style/b2c_en_gb/shop/bracelets/bracelets-all/robyn-bracelet.html
Hi Nicola,
It’s definitely a square knot behind but it looks like some beads have been woven on top. I can’t work out who. Check out the blog honestlywtf.com….great bracelet tutorials ^_^
Love it! And plan to make my own this evening. I will do a few things different. THat’s the great thing about crafting and creativity, everyone’s is different. I will use these fun geometric shaped beads I salvaged instead of hex nuts. And I will do the closure a little bit differently. I saw a tutorial for another bracelet made from string or cord. They had the loop on one end like you have, but instead of leaving the ends raw to tie at the other end, they sewed a button to that end. Then you just pull the loop end over the button and TA DA, its secure. I also will do several different looks with this. CANNOT WAIT! Thanks for the clear instructions and photos!
Oh and I Pinned this to Pinterest.
(*^__^*)
I agree that was confusing, because the instructions say to cut four lengths. But there are really only two. I think it would be helpful if she ammended the instructions. If you cut four lengths, there would be four loops.
Now that I know it’s two, can’t wait to try this! Love the look of it!! Thanks for the tutorial. :0)
This is really neat I made one I hope my bf likes it XD
Yay….glad it went well Charlie 🙂
Hi Chloe…do you mean when you are wearing it?
You may also use a larger hexnut to stay in theme 🙂
Brilliant tutorial, am making a version with my guide group tomorrow evening, but with round beads instead.
Thank you!
There are four separate lengths. The two in the middle never get knotted, only the outside two?
I have been macrameing for decades. I find you can use any material depending on what type of bracelet your making.
For me, I use Hemp Jute, my bracelets are more bead oriented and the jute does not take away the effect of the beads.
Hi,
I just check this bracelet out and it’s really fun to make. I got through the beinging and it started twisting up. How do you keep it from twisting?
~ Tina
hi there this is a great idea,
I have one question though
did you use 2 pieces of string and folded them over or do it a different way??
as I have found that the length you suggested isn’t long enough to make the bracelet
I really want to make this just unsure
thanks
Hi Erinina,
For the hex-nut bracelet I used four lengths of string, measuring about 60cm. You can use two lengths at 160cm. It’s hard to be precise because it depends on the width of the string and the size of your wrist.
Hope that helps. Kate ^_^
Hi Tina, Are you sure you are tying the knot correctly. It sounds to me like you are just tying a half knot over and over again. This would twist like a spiral.
that’s brill thanks a lot, I’m just starting out so still trying to work it all out and things can be done.
thank you for your help
Erin 😀
hi can I also ask what mm the nuts were that you used??
thanks
Made the bracelet today! its not quite as pretty or neat as yours but i love it!
thanks so much for the idea & tutorial!
How would you make the ends meet? I want to make the ends so that it can come off, what would you recommend doing?
Such a nice bracelet! Great idea!
Hi Keolani…you need to make a sliding knot. If you google ‘sliding knots for friendship bracelets’ you should be able to find a solution.
I love it! Really want to make this.
That’s really really cool, thanks for sharing! Had to make my own 🙂 Thanks for the tutorial!
How long is the cord before you make the bracelet? Or how much cord do I need for each inch I make?
Hi Jennie, It’s so hard to give an exact measurement because it depend on how wide your cord is, how tightly you tie the knots and also the diameter of your wrist. I would recommend making a small test piece – and inch or two and then un-tying it to see how much you have used.
HTH Kate ^_^
when i made my bracelet it started like twisting, it didn’t stay straight, am i doing it wrong?
Heya this is just awesome. I found this in google images. Just my luck. Anyway, I wondered about how to thread a bead onto the cords for the tying up end ( saw it in a comment) and dont really know. If the person who created the bracelet could just give a hint on how to use the bead at the end…? If this made sense.
what’s the material of the string?
It look likes special, but i can’t find it at all.
I love this bracelet. I am a kind of a girly girl and I love jewelry that matches my clothing either in texture, color, or attitude. I would go into debt just trying to purchase accessories to match my wardrobe. I really appreciate this tutorial because it shows that you can have equally stunning jewelry made at home for a fraction of the price of store bought jewelry. Thanks a bunch!
Hey! Would you mind if I made these and put these on my etsy? I would credit the idea to you, and I do love making these.
bonjour j’aime beaucoup ce modèle moi j’en ai fait deux autres pas tout a fait identique mais avec a peut près le même matériel il se trouve aussi sur mon pinterest mon pseudo est anjinsan et il est sur le tableau macramé et bracelet brésilien
en toutes amities
My side strings keep getting shorter because they are the only ones I’m using. Each time I pull the strings from the side and it is always the ones I just used. Is this right or am I doing something wrong?
Thats right….the central cords stay the same length – make sure your outside cords are longer when you start to make the bracelet.
Thankyou!!
Love how the rawness of the cord contrasts with the hex nuts! Am doing a round up of the best hex nut DIY tutorials for my DIY blog hapinesswherever.wordpress.com Would you mind if I link to your site and use 1 of your pictures? 🙂
Really nice bracelet!! Thanks For THE instructions;)
Hi just wondering how I would be able to incorporate.38 or .45 stainless steel bullet casing into the bracelet instead of hex nuts ? Any help would be great as I want the casings to lay horizontal instead of perpendicular.
Thanks Paulette
Is it 4 cords? It looks like 2 cords folded in half to make the loops at one end. ???